24/05/22 React router dom 기본 사용법
목적
이제 라우팅을 도입해 리액트로 간단한 프로젝트를 도전해보려고 한다. 그래서, 까먹으면 찾아오려고 작성해본다. 물론, 캠프 과제부터..!
설치 방법
1
yarn add react-router-dom
이후, 프로젝트 내의 package.json 에 잘 추가 되었는지 확인해야한다.
사용법
아무런 hook 도 사용하지 않는 기본 사용 방법은 다음과 같다.
1
2
3
4
5
6
7
8
9
10
11
12
13
14
15
my-app/

├── node_modules/
├── public/
├── src/
│ ├── components/
│ │ └── Router.jsx
│ ├── pages/
│ │ ├── Home.jsx
│ │ ├── About.jsx
│ │ ├── Contact.jsx
│ │ └── Works.jsx
│ └── App.jsx
├── package.json
└── package-lock.json
이런 프로젝트 구조를 가졌다고 가정해보자.
먼저, Router.jsx 부터 구성해보자.
1
2
3
4
5
6
7
8
9
10
11
12
13
14
15
16
17
18
19
20
21
22
// Router.jsx
import React from "react";
import { BrowserRouter, Route, Routes } from "react-router-dom";
import Home from "../pages/Home";
import About from "../pages/About";
import Contact from "../pages/Contact";
import Works from "../pages/Works";

function Router() {
  return (
    <BrowserRouter>
      <Routes>
        <Route path="/" element={<Home />} />
        <Route path="about" element={<About />} />
        <Route path="contact" element={<Contact />} />
        <Route path="works" element={<Works />} />
      </Routes>
    </BrowserRouter>
  );
}

export default Router;
App.jsx 는 아래 처럼 구성이 가능하다.
1
2
3
4
5
6
7
8
9
// App.jsx
import "./App.css";
import Router from "./shared/Router";

function App() {
  return <Router />;
}

export default App;
이후, 라우팅 대상인 pages 내의 컴포넌트들을 구성해주면 된다.
1
2
3
4
5
6
7
8
//Home.jsx
import React from "react";

function Home() {
  return <div>Home</div>;
}

export default Home;
이제부터는 hook에 대해 간단히 알아보자.
useNavigate()
useNavigate() 를 이용하면, 웹 페이지의 네비게이션 바 처럼 특정 링크로 보내주게 만들 수 있다.
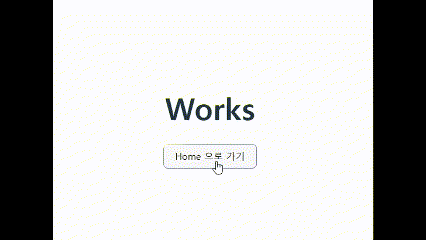
방금 위에서 보았던 Home.jsx 에서 Works.jsx 로 이동시키고 싶을 때 이렇게 작성할 수 있다.
1
2
3
4
5
6
7
8
9
10
11
12
13
14
import React from "react";
import { useNavigate } from "react-router-dom";

function Home() {
  const navigate = useNavigate();
  return (
    <div>
      <h1>Home</h1>
      <button onClick={() => navigate("/works")}>Works 로 이동</button>
    </div>
  );
}

export default Home;
useLocation()
useLocation() hook 은 location 객체를 얻어올 수 있다.
1
2
3
4
5
6
7
8
9
10
11
12
13
14
15
16
17
import React from "react";
import { useLocation, useNavigate } from "react-router-dom";

function Home() {
  const navigate = useNavigate();
  const location = useLocation();

  console.log(location);
  return (
    <div>
      <h1>Home</h1>
      <button onClick={() => navigate("/works")}>Works 로 이동</button>
    </div>
  );
}

export default Home;
이렇게, location 을 콘솔에서 확인해보면 현재 페이지 내의 정보를 얻을 수 있다.
아직 이 정보가 어떤 것들인지는 잘 모르겠지만..! 추후 정리해보도록 하자.
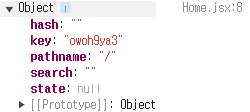
pathname 은 현재 링크 location이 필요할 때 유용할 것 같다.
link
link 는 hook 이 아니라 tag 다.
역할은 a 태그를 완벽히 대체하는 것이다. 실제로 link 태그를 쓰면 브라우저 상에서 요소를 확인할 때 a 태그로 바뀌어 있다.
하지만 그렇다고, 명시적으로 HTML 의 a 태그를 작성하면 안된다.
실제로 a 태그를 쓰면 지정한 링크로 이동할 때 브라우저에서 웹 페이지를 다시 로드하기 때문에 지금까지 저장되었던 State 가 모두 날아가는 문제가 생기기 때문이다.
그럼, 리액트를 써서 SPA 를 구현할 이유가 없기 때문…!
1
2
3
4
5
6
7
8
9
10
11
12
import React from "react";
import { Link, useLocation, useNavigate } from "react-router-dom";

function Home() {
  const navigate = useNavigate();
  const location = useLocation();

  console.log(location);
  return <Link to="/contact">Contact 페이지로 이동하기</Link>;
}

export default Home;
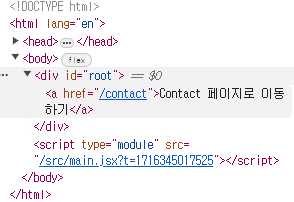
정말 a 태그로 바뀌어 있다!
children 와 동적라우팅
리액트의 props 에 대해 다룰 때, 살펴본 적 있었다. 컴포넌트에 자식 요소가 존재하긴 하지만, 동적으로 구성되는 상황에 사용할 수 있다.
예를 들면, 방금 예시로 다루었던 페이지의 구성을 보자.
1
2
3
4
5
6
7
8
9
10
11
12
13
14
15
16
17
18
19
20
21
22
23
24
// Router.jsx
import React from "react";
import { BrowserRouter, Route, Routes } from "react-router-dom";
import Home from "../pages/Home";
import About from "../pages/About";
import Contact from "../pages/Contact";
import Works from "../pages/Works";

function Router() {
  return (
    <BrowserRouter>
      <Layout>
        <Routes>
          <Route path="/" element={<Home />} />
          <Route path="about" element={<About />} />
          <Route path="contact" element={<Contact />} />
          <Route path="works" element={<Works />} />
        </Routes>
      </Layout>
    </BrowserRouter>
  );
}

export default Router;
여기서, 새로 추가된 것이 있다. Layout 컴포넌트를 추가한 이유는, Routes 는 path 에 따라 동적으로 변화하는 부분이다.
이때, 다양한 Route 중 어떤 것이 들어오더라도 웹 페이지가 동작하도록 만들기 위해서 Layout 컴포넌트에서 Header 와 Footer 사이 children 이라는 형태로 props 를 받아주도록 만들었다.
1
2
3
4
5
6
7
8
9
10
11
12
13
14
15
16
// Layout.jsx
function Header() {
    return <header>헤더</header>
}

function Footer() {
    return <footer>푸터</footer>
}

function Layout({ children }) {
    return (
        <Header />
        <div><children /></div>
        <Footer />
    )
}
이렇게 구현해주면, path 에 따라 children 이 달라지더라도 문제없이 렌더링이 가능해진다!
useParams()
동적 라우팅에서, /path 에 따라 다른 컴포넌트를 보여주도록 만들었는데 이렇게도 설정이 가능하다. path="/works" 부분을 유심히 보자.
1
2
3
4
5
6
7
8
9
10
11
12
13
14
15
16
17
18
19
20
21
22
23
24
// Router.jsx
import React from "react";
import { BrowserRouter, Route, Routes } from "react-router-dom";
import Home from "../pages/Home";
import About from "../pages/About";
import Contact from "../pages/Contact";
import Works from "../pages/Works";

function Router() {
  return (
    <BrowserRouter>
      <Layout>
        <Routes>
          <Route path="/" element={<Home />} />
          <Route path="about" element={<About />} />
          <Route path="contact" element={<Contact />} />
          <Route path="works:id" element={<Works />} />
        </Routes>
      </Layout>
    </BrowserRouter>
  );
}

export default Router;
:id 라는 부분이 더 생겼다. 한 path 내에서, 동적으로 달라지는 것 또한 처리하기 위해서 이렇게 사용할 수 있다. 그때, 저 id 값이 어떤 값이 들어오는지 직접 확인도 가능하다.
1
2
3
4
5
6
7
8
9
10
11
12
13
14
15
16
17
18
import React from "react";
import { Link, useParams } from "react-router-dom";

function Detail({ path }) {
  const params = useParams();
  console.log(params);
  console.log(`params.id: ${params.id}`);

  return (
    <div>
      <h1>Detail</h1>
      <span>{path}</span>
      <Link to="/">Goes to Home</Link>
    </div>
  );
}

export default Detail;
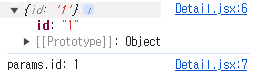
이렇게 어떤 url parameter 가 들어왔는지 알 수 있다!
Outlet
아래 동적 라우팅 예시에서, 동적 라우팅으로 처리한 path 내에서 또 동적 라우팅이 필요할 수 있다. 이때, Outlet 을 이용해 처리할 수 있다.
예를 들면, /about 하위 경로로 dashboard 컴포넌트를 연결시킨다고 가정해보자.
1
2
3
4
5
6
7
8
9
10
11
12
13
14
15
16
17
18
19
20
21
22
23
24
25
26
27
28
// Router.jsx
import React from "react";
import { BrowserRouter, Route, Routes } from "react-router-dom";
import Home from "../pages/Home";
import About from "../pages/About";
import Contact from "../pages/Contact";
import Works from "../pages/Works";
import Dashboard from "../pages/Dashboard";

function Router() {
  return (
    <BrowserRouter>
      <Layout>
        {/* ✨ Layout! */}
        <Routes>
          <Route path="/" element={<Home />} />
          <Route path="about" element={<About />}>
            <Route path="dashboard" element={<Dashboard />} />
          </Route>
          <Route path="contact" element={<Contact />} />
          <Route path="works:id" element={<Works />} />
        </Routes>
      </Layout>
    </BrowserRouter>
  );
}

export default Router;
Router 에서 Route 하위의 Route 를 만들어 준뒤, about 컴포넌트에서는 다음과 같이 수정해줘야 한다.
1
2
3
4
5
6
7
8
9
10
11
12
13
14
15
16
17
18
import React from "react";
import { useLocation, useNavigate, Outlet } from "react-router-dom";

function About() {
  const navigate = useNavigate();
  const location = useLocation();
  return (
    <div>
      <h1>About</h1>
      <p>현재 페이지: {location.pathname}</p>
      <button onClick={() => navigate("/")}>Home 으로 가기</button>
      <Outlet />
      {/* ✨ Outlet 이 추가되었다.*/}
    </div>
  );
}

export default About;
이 Outlet 을 이용하면, about 컴포넌트의 하위 경로인 /about/dashboard 로 이동해도 about 컴포넌트 내부에 dashboard 가 잘 표현되는 것을 확인할 수 있다!
끝!